- Print Console is the printer's controller where you can have control of the printing process.
Take note that the printer console requires Java Runtime Environment Plug-in (JRE)
Version 1.2 or higher for you to launch the printer console. If you don't have
this plug-in, install it first. To do so, go to the Software folder
and expand it. Click on the
Java Runtime Environment.
- If this plug-in is now properly installed in your pc, you can now launch the printer console
by clicking Printer Console under the Print Server folder.
- This will launch the printer console as shown below. All available print queues will be shown
on the printer console ready for printing.
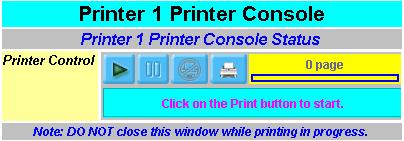
Here are the functions of the following:
 : Print - Click this button to start printing.
 : Pause - Click this button to pause printing job.
 : Cancel - Click this button to cancel printing job.
 : Printer Setup - Click this button to bring out the printer's
setup.
: Printer Setup - Click this button to bring out the printer's
setup.
 : This is the status window of the print job where number of pages to be printed are
displayed.
: This is the status window of the print job where number of pages to be printed are
displayed.
 : This is the activity window where some remarks are displayed.
(i. e. No e-doc Document to Print...) This also shows the name of the document page being printed.
: This is the activity window where some remarks are displayed.
(i. e. No e-doc Document to Print...) This also shows the name of the document page being printed.
Note:
- When you pause a printing process, it will still print the current process
until it is done and will cancel the next in line print process.
- When you cancel the print process, this will stop the printer from printing the current
document page.
- As the printing starts, the status of the queued
document will change to printing signifying that the printing has began.
- To Refresh the printer console, right click on the
white background and select "Refresh".
- To close the printer console window, click on the
 on the top most right corner of the window or
press Alt + F4 simultaneously on your keyboard.
on the top most right corner of the window or
press Alt + F4 simultaneously on your keyboard.
|