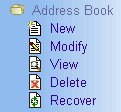
- To create a Mobile Device file, expand the My Profile folder,
expand the Address Book folder and click New.
You can confirm that you are on "New" when your mouse cursor changes into a pointing hand.
Press or click your left mouse button.
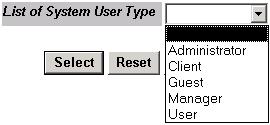
- You'll notice that a selection will appear. It will say, "Select a System User Type."
Move your mouse cursor over the choices. The choices look like a text box
with a little arrow pointing down on its right side. Click anywhere on it.
- If you followed steps 1 and 2 correctly, you will see the choices, which are;
Administrator, Client, Guest, Manager,
User. These are the System User Types. If the user you want to add in
your address book belongs to Manager, choose Manager, if he/she belongs to the type Client,
choose Client, and so on and so forth.
- Now that you've decided and know where that user belongs, you need to highlight
the type by hovering your mouse cursor over that System User Type.
For example, you want to add someone from the System User Type Guest,
all you have to do is click the options (remember the little text box with the little
arrow that is pointing down on its right side?), hover on the word Guest,
it will be highlighted with dark blue. After that click on it using the left mouse button.
After this, you'll be taken to the Guest Selection page,
since the System User Type we chose was Guest. If you chose Client, you'll be taken to
the Client Selection, and so on and so forth.
- There are also buttons here, namely Select, Reset, and Cancel.
Actually, you don't really have to press any of these buttons for now because once you've click
the System User Type you want in the selection box, you'll be taken to the next page right away,
but I'll explain the use of the buttons anyway.
Ok, the Select button actually, by its name, selects your selection.
Like think if you've chosen your System User Type and you do not automatically go
to the next page. You've highlighted it, but nothing happens.
You need to click this button to confirm that choice was what you wanted and, boom,
you go to the next page. Ok, that was a little confusing, I'll explain using an example.
Assuming you have chosen the System User Type Guest, and you did the steps above (1 to 4).
You'll be in the Guest Group Selection page.
Then you accidentally or maybe intentionally pressed/clicked Back in your browser.
You'll be back in the System User Type selection screen, but this time in the selection,
Guest is the one highlighted. You can press the Select button to go back to
the Guest Group selection screen!
Next is the Reset button, this button removes the selected choice.
Actually, this works just like the select button except that it doesn't take you to
the page in relation to your selection but, instead clears your selection.
It's as simple as that.
And lastly, clicking the Cancel button takes you back to the welcome screen.
- After you have chosen the correct System User Type, you'll be taken to a new selection page.
Ok this is a little tricky. IF there are less than 10 users in that System User Type,
you'll see a selection similar to the System User Type selection (the text box with an arrow).
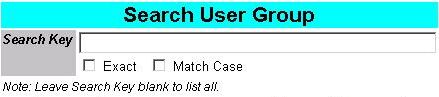
BUT IF, there are more than 10 users in that System User Type,
you'll see a search box.
Extensive explanation for the search
feature can be found here.
For the meantime, let's stick to the simple less than 10 selection ok?
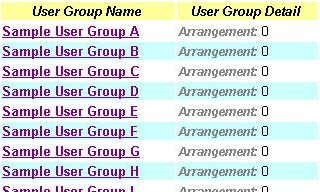
- Once you have done steps 1 to 4 correctly, you'll see another selection screen.
In our previous example, we have chosen the System User Type User.
So if you follow the example, you'll be seeing the User Group selection screen.
The methods of choosing the group are the same as choosing a System User Type.
Just refer to steps 1 to 5 for more details.
- You'll notice in this selection screen, there will be a new button
captioned Change User Type. This simply takes you back to
the System User Selection screen.
- Once you have done step 6 correctly, you'll see another selection screen.
Following our example, you should be now on the User selection screen.
What you'll be seeing are the usernames of the users in that group.
These are actually what you will be adding in your address book.
The methods of choosing the user are the same as choosing a System User Type.
Just refer to steps 1 to 5 for more details. See sample below.
- Atlas, now you'll be taken to the information page, if you've done all the steps carefully
and correctly.
|